- Description
-
Details

Function Introduction
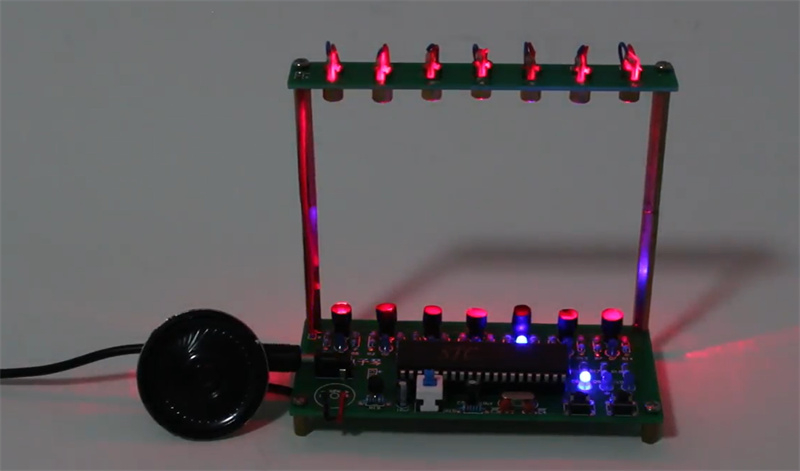
The laser harp is a harp without strings, replaced by a bright red laser beam representing 7 notes. The user only needs to play the beam, which means blocking the laser with their fingers, just like plucking the strings and still playing a melody. You can also adjust the pitch, which is low, medium, and high. There are a total of 21 different tones. Additionally, there are several built-in music to listen to. The effect is better when used in darker environments or at night.
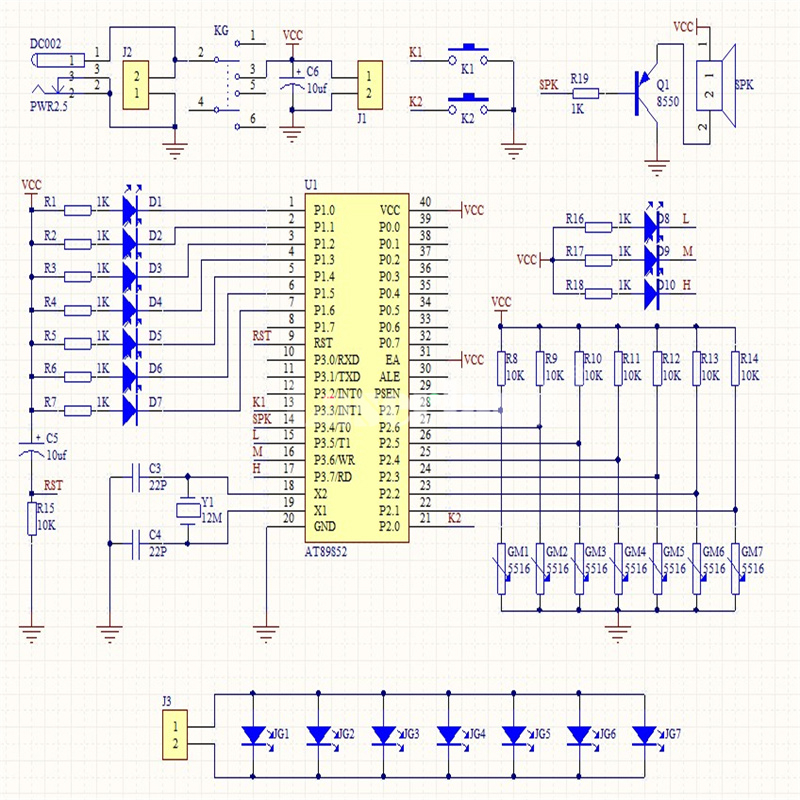
Circuit principle
The circuit consists of Photoresistor and single chip microcomputer STC89C52. When the beam is blocked, the corresponding Photoresistor senses and produces resistance value changes, and the system composed of 8 Photoresistor produces high and low potential changes, and the microcontroller reads the high and low potential changes of Photoresistor to complete the input of operation instructions. The microcontroller controls the data transmission through the serial port according to the command information, that is, it assigns values to the data ports of loudspeaker and lamps and generate corresponding reactions. When there is laser irradiation, the microcontroller reads the voltage of the Photoresistor, which is low level at this time. When there is no laser irradiation, the microcontroller reads the voltage of the Photoresistor, then it is high level. In this way, when the light from the laser is
obstructed, a switching effect can be generated in the circuit.
Explanation about the chip:
Pin: Place the notch or dot on the left, with the first pin in the lower left corner and the last pin in the upper right corner.
Direction: For those equipped with a base, the base should be welded first, and the direction of the chip and base gaps should be consistent with the direction of the gaps on the board.
Installation: The new chip pins are tilted outward and can be pressed inward by hand or vertically on the desktop before being inserted into the IC socket.
Welding guidance
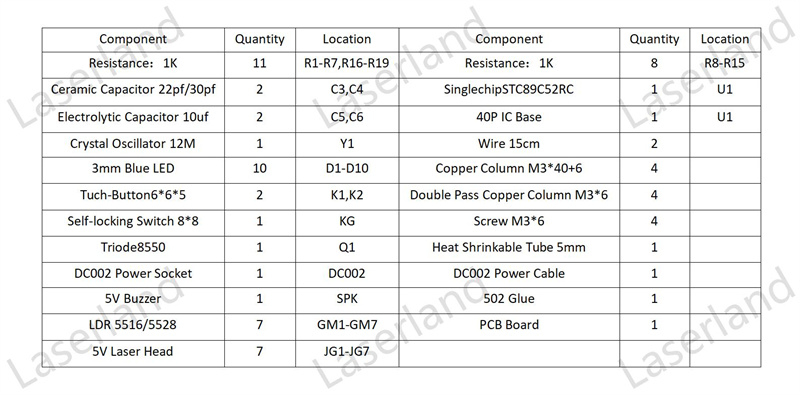
1. The resistance value should correspond one-to-one with the markings on the board. Those who do not understand the color ring can be judged or measured based on the quantity.
2. The long pin of Electrolytic capacitor and LED is positive pole, and the loudspeaker can be regardless of the positive and negative poles, and the triode is inserted according to the shape on the board.
3. The direction of the gap between the microcontroller chip and the base must be consistent with the direction of the gap marked on the board, as reverse insertion can burn the chip.
4. When welding the Photoresistor, the height from the plate shall be about 5mm.
5. Cut out 7 sections of heat-shrinkable tubes with a length of about 8mm and put them on the Photoresistor.
6. Use an electric soldering iron to heat the lower end of the heat-shrinkable tube to shrink and wrap the heat-shrinkable tube on the pin of the Photoresistor.
7. Only the lower end of the heat-shrinkable tube need iron. The purpose is to fix the heat-shrinkable tube and not affect the Photoresistor to receive light.
8. Adjust each Photoresistor and heat-shrinkable tube to make them perpendicular to the board.
9. The lead of the laser head can be appropriately cut short, and a small section of insulation skin at the end of the wire can be burned off to control the loose wires into a bundle.
10. Insert the laser head, weld the leads, and pay attention to the positive and negative electrodes.
11. Assemble the whole laser Electronic keyboard, weld the two wires between the laser plate and the main board, and pay attention to the positive and negative poles.
12. Power on, adjust the laser head so that the laser beam just shines on the Photoresistor.
13. Use 502 glue to keep the laser on the Photoresistor, and let the glue dry before you release it.
14. Please pay attention to safety when using glue. It is recommended to wear gloves, preferably for adult operation or using other methods to secure.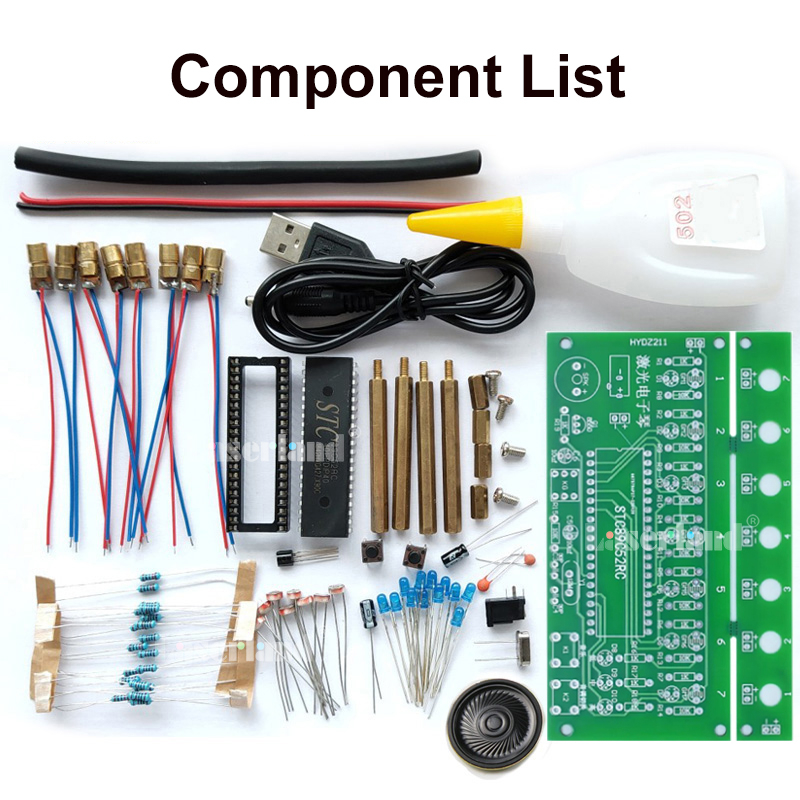
- Additional Information
-
Additional Information
Brand Laserlands Housing Shape Cylinder SKU 20331005 Wavelength No Output No - Reviews
-
About US
Laserlands is Laserland's Online Store. Laserland focuses on laser manufacturing and sales for 10 years. We supply laser diodes, diode laser modules and of various sizes and wavelength, with reasonable prices, excellent quality for customers all around the world.
Laserland, Laserlands are registered trademarks owned by Besram Technology Inc.

Order and Inquiry
COMMUNICATIONS
Facebook @laserlands
Twitter @laserlands
Email: laserlands@gmail.com
Skype: laserlands